I LOVE U

 V059

A request I received last year from a regular customer of mine to make a love theme card for her dear BF........but at the time I just didn't have the time to make one for her, so she had to wait to get it this year. And since she gave me the full freedom to design it for her, I decided to use one of my current favourite type of layout which is the center step up card to make the love theme card for her.

I love using the engraving technique for the words "I <3 U".....just a simple engraving... First time for me to engrave the paper and then emboss it with the swiss dots emboss template. Love the effect! :)

I also loved using the MS Vintage Heart craft punch for the center part of the design and for the space inside the card for writing personal wishes.....I haven't been using that craft punch much, but I'm glad I found another way of using it as a part of the decoration for the card.

I bought some love theme teddy bear sponge stickers some time ago but been keeping them for future projects and thought that this love theme card would be suitable for using them. There are many designs of the love theme teddy bears but not all are suitable to be pasted for this particular design......so I will have to find another design to use them up.

What is important is, I had fun making this card! ;) 


Just for you....dear friend

JFY006

Previously I wanted to make 2 thank you cards for my 2 friends but then I decided why not make 2 different cards for them......I didn't want them both to get the same design. So today I played with my not so new craft tool and made this Side Step Card.....and instead of making a thank you card....the wordings for the card is a little different..... :) but it will definitely suit what I'll be using it for. 

You  must be wondering why I'm using a lot of blue colours for this card.......well, it's because my dear friend loves the blue colour just like me! Yup, we both love blue ;)

I used the clear stamps that my dear friend gave me some time ago......I'm not sure if she remembers all the clear stamps she gave me....I'll be sure to remind her about it ehehehe.... I really love the special wordings clear stamp....first time for me to use it. I'm keeping my promise so far.....to use more of the clear stamps or rubber stamps that I have in my collection. Hopefully I'll be able to use up all of them this year. I'm feeling guilty for not using them a lot in my card designs......feels like it's a waste of money for buying them, and yet, just keeping them safely in the drawers. I must, I must, I must USE them!!! I shall!!! ahahahaha! :D

The die cut quilled rose flower I used for this card is pretty fun to make. It's not super fancy or super complicated to make .....but it does add a special touch to a simple design and makes it special. It's funny how easy it is to make a simple card turn into something fancy the minute I added those roses. I'm not really an expert in making paper roses from scratch but I will give it a try some day when the mood arrives.....hehehe.....I wish I will be granted with some patience to do so in that area. ;)


My first step card!!

TY005

I've been experimenting with this step card layout since last year but never got the chance to complete the card till now. There are so many types of step card that I wish to try out so I tried making this one first which is called the "Center step card" and will try to do more of the other types later on this year. I love all types of step cards as they give such a different type of layout that is suitable for different embellishments. It's so much fun for me to try them out.

I haven't made a thank you card for quite sometime now......and this particular one was made for 2 of my dear friends who have been supporting my work and motivating  me since my early days of designing cards and selling them online.  Been a while since I designed a card for them so this is something that I have been wanting to do since last year and finally I get some time off to make this card for them. Hope they will like it! ;) Oh....forgot to mention that the pattern paper I used for this card was given to me as a gift by one of them.....hehehe....I wonder if she will recognize the paper when she sees it! hehe! ;)

I gotta say that I just love making this step card........I'll definitely make more of this type of card this year. Loving it so much! :)


Gold, silver and a bit of red!

QF010

Ok.....so here it is.....the gold and silver flower photo frame I mentioned in my previous post. I added a couple of birds for this flower arrangement. At first I thought it was not possible to do so since most of the time I make my quilled birds quite big in size and probably won't fit in nicely on this half A4 size photo frame. But since my customer requested it and wished to have some birds in either of the photo frames, I decided to give it a try by making them smaller in size.

The request from my customer was that I must think of a colour for the design that would  match with gold and silver. I used to make gold and silver flower arrangement before.....it was a combination of white, black, gold and silver and those colours seemed like a perfect combination but when I had to think of what would match just gold and silver, it was tough......until it came to me how red would seem like a good match for those two colours. Bingo! :D

But later after that, I was a bit confused when it came to decide on what colour to use for the leaves of the flowers......somehow green doesn't seem to match the gold and silver.....so in the end.....I decided to make some swirls as part of the decoration for the flowers.....and swirls can be of any colour.....and that's when I decided that they would be in gold and silver too! hehe! The idea of adding those tiny gold sequins was just something I dared myself to do.....I wasn't too sure about it and started to treat my photo frames like how I treat my handmade cards by doing that. :P

For me, the important thing is I have to be happy with the results of my artwork before I show it to my customer......as long as I'm happy with it, then it'll be ok.....and sure enough it is coz my customer was happy with it.....so it's a bonus when that happens......coz sometimes it doesn't happen that way..... you can't please everyone right? hehe......I'm just glad that I'm happy and she's happy..... hope everyone is happy too today! ;)


Tiny loops flower photo frame

 QF009

Last year I accepted an order from a customer who wanted me to design 2 different quilled flower photo frames for her......and she gave me the freedom to design it any way I like it.....but she did have a request for one of them to have some silver and gold colour in the design. I've done that already and I shall be blogging about the silver and gold photo frame in my next post.

Actually I didn't want to take any more customize orders since last year because of my ill health. But I accepted this one because she was willing to wait for a few months for me to get it done for her.....so I could take my own sweet time to get it done....no rush, no stress and I liked that very much hehehe... :). I just want to be able to design whatever I like and sell my designs to those who fancy them. Easier for me considering my current condition. 

At first when I received this order, I had a hard time deciding which type of flower I wanted to make for the frame. Then I decided to use this tiny loops flower design since I haven't made them for quite a long time. I've forgotten how much fun it is to make them using the hair comb. I used to make them in multicolours, in single colours and now I made them in two different colours....soft pink and aqua blue. I love the combination a lot :).

The leaf design......hehe....I had a hard time deciding which type of leaf that would be suitable for the flower.....I made a few types to choose from and finally I seemed to like this simple slim tear drop shape instead of the other types I tried making to suit the flowers. I don't know why but I really like the combination of the two design together. They just looked good together. Well, that's just my opinion.... ;)

My customer did insisted that I add some butterflies or birds in any of the two designs......so for this one I chose butterflies to go together with the flower arrangement. I'm so glad that she loved them so much ^.^. Mission accomplished!


Purple birthday trishutter card

 HB110

Another trishutter card for this year hehehe.......another full front view type which I like very much :). However, I'm still experimenting on the other types so that I would give it a try at least once to make it different from how I used to make them before. I wish that I am able to speed things up coz I work so slow these days. Trying my best though....

This particular one has purple colours all around the card and I'm making use of the paper I have available .....you might have seen this flower pattern paper before.....as I'm trying to finish up whatever pattern paper I have left  in my collection so that I can get new ones in future :). Almost all the areas in the card is filled up with pattern paper and other embellishments, so I left the pop up area to be used as a place to write personal wishes....so that the area where the giver of the card writes down his or her wishes would stand out once the receiver opens up the card. I like it that way :).

You can take a closer look at it and see how it opens up from the video I uploaded on Youtube below: 


January 2013 Blog Giveaway


Peace be upon everyone on this lovely day :)

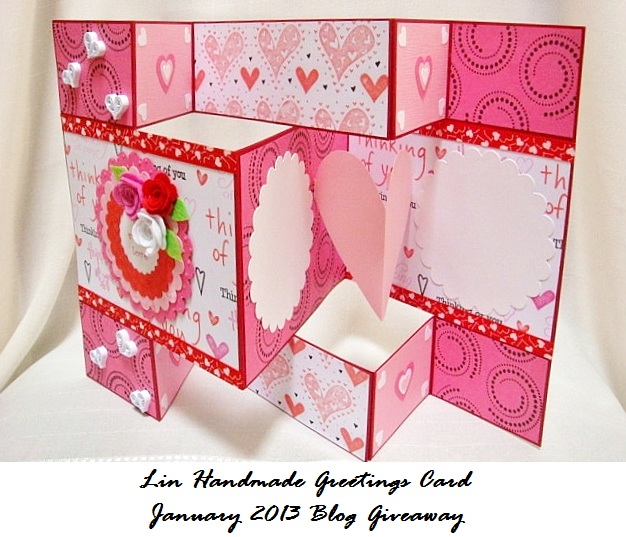
I'm very excited to hold another giveaway this year and hopefully I'll be able to consistently do so for each month of the year to show my thanks to all my loyal readers. For the first giveaway this year, I'll giving away the trishutter card you see at the photo above. Hope you all like it ;)

I've been getting a lot of feedbacks from my loyal readers the past few months and a lot of them were disappointed when at one point I didn't allow those who didn't have blogs to participate in my giveaways, because they only have a Facebook account. So for this year, I'll be giving everyone a chance to participate in my giveaway, provided that everyone who participates will in return help promote my giveaway too, at their blogs or at their Facebook. Easy right? So now everyone can join. Unfortunately I see that even though I make it easy for people to join, still a lot who joined did not promote my giveaway at their blog or at their Facebook....that's sad.....so I hope that if you truly want to join and win a prize, please follow the rules so that if your number is chosen by the Random Number Generator, at least I won't have a reason not to pick you as a winner.

All you have to do to stand a chance to win this prize is:
Promote this giveaway post by copying and pasting the link of this giveaway post to your Blog or Facebook. You can either blog about this giveaway by pasting the photo of the giveaway and the link or just paste the giveaway photo and link at the sidebar of your Blog or paste the link at your Facebook. And then copy and paste the link of where you promoted my giveaway to the Mr Linky section below. Don't forget to write your name there as well. 

Do Follow my blog and LIKE my Facebook Fan Page too! All the best!!! :)

This giveaway starts today till 11.59pm on 31st of January 2013. The name of the winner will be announced during the first week of February 2013. Thank you for participating, I truly appreciate the support ;).


BLOG GIVEAWAY CLOSED


My sweet love

 V058

I was thinking and thinking last night of what to giveaway for the first month of the year....my first giveaway for this year.....and suddenly TING!!!! I immediately thought of a Thinking of You tri shutter card that I made in 2011....you can view it at the link HERE. It was not 100% completed at the time, but I blogged about it anyways because I wanted to show an example of a card I decorated using plain paper that was stamped with patterns made by clear stamps. It was all because at that time, I didn't have a lot of pattern paper to use as decorations on my handmade cards. So I had a lot of fun stamping all those clear stamps! hehehe. :D

So now it's 100% completed. I added a couple of white paper that was cut with scallops shape around it to be used as a space to write personal wishes.....and a soft pink pop up heart in between them.....and at the front of the card, I added some wordings with some felt rose flowers.

So I will be giving this card away to one of my lucky readers after the giveaway ends. I shall blog about the giveaway soon. ;) Don't forget to participate!! hehe! ;)

Do view a video of the card below :)  


Winner of December 2012 Blog Giveaway


Sorry for the long wait everyone! I've been a little busy with work so didn't have time earlier to announce the result of last year's December 2012 giveaway. The result is finally out today!!! Yay!!

Congratulations to Ms. Nur Fa'izah Raziqin bt Ahmad Zainal Abidin for winning the giveaway!! Do email me your full details so that I can post the prize to you as soon as I can. :)

Good news for everyone....I will still continue doing giveaways for 2013....hopefully I can do it every  month just like last year. Will be giving away something this month....so do check out my next post that's coming soon this week in shaa Allah :)

Hope everyone will have an exciting and wonderful new year!!!! 


Pink and white rose tri shutter card

HB109

After so long of not designing cards due to my ill health, it feels great being able to do so now. And even better when I get to try something new for myself this year. I'm happy that finally I can post a card design here today on the first day of the year, yay!!

I've always loved making tri shutter cards but something about making them sometimes stops me from making more. Probably because I am not comfortable decorating the front view of the card with less space on it. So I opted to make the full front type of tri shutter card instead. Besides the reason that I could also make use of the pop up part inside it when I make them this way. Since I love making pop up so much, so it was a win win thing for me. I'm definitely more comfortable making them this way.

I also love the fact that this year I get to use some die cut patterns I made using the die cut machine. It's something new for me to try out and I gotta say it's really an awesome experience. I really loved it a lot. I hope to make more craft products using the die cut patterns. I don't have a lot though since I'm just a beginner....plus it's pretty darn expensive to buy.....so I'm collecting them bit by bit hehehe.

I can only make about 4-5 of this design because of the pattern paper I used for this card was given to me by my dear friend and I don't have a lot of it.....hehehe....perhaps I can find a substitute pattern paper for it someday that would suit the design. I really love making those cute rose felt flowers and the pop up inside the card. The white space area on the right and left side of the card is for writing personal wishes.

You can view more of the card at the video below:

Featured Post

How to make two tone tear drop shape quilling flowers

We are coming close to mid February and I'm blogging about something that I did last January! LOL! It's been a month sin...